Sunday, 28 February 2016

20mm English Civil War Figures

I'm busy trying to put together a set of custom playing cards to use for unit activation in my wargames. I mostly play with 6mm, but photographs of individual units lack the impact of the bigger scales, so I decided to dig out my old 20mm plastic ECW figures for the photoshoot. Actually bothered to set up a back drop, shoot with the (natural) light behind me, and add a bit of scenery. And for someone who's never really majored on painting or photography I was quite pleased with the result. Here are a few choice images.


Dragoons


Royalist Artillery (Orange coats I believe)


Cavalry


Commanded Muskets

A Russet Regiment

A Green Regiment


White Northern Foot


A close up of the Russet Regiment

A Grey Regiment


Close up of the Green Regiment

Haselrigs Lobsters

Wednesday, 9 December 2015

100 Days Bicentenary: Wavre

Seeing as it doesn't often get an outing, and as visiting the Bierges bridge over the Dyle, where Gerard was killed, last year had been quite poignant,  I thought I'd fight through both days of Wavre.


Rules were SLS, Battalion scale, with Hexon terrain at 200m per hex. Not my normal combination but the hexon terrain is just wonderful and so I wanted to find out how to use it at my normal 100m = 4cm scale for 6mm battalion scale games. I mentally treated each hex as though it had a front/back half, so each 200m hex had two 100m halves. It wasn't ideal, and would be a nightmare if played against a competitive opponent. Need to have another think as I would still like a solution to this.


Starting positions, with Grouchy and Gerard approaching Wavre and the Dyle from the South (SE in reality).

DAY 1

5pm/T3

Habert's 10e Div thrown against Wavre, but loses 3 Bn just from the 2 x 12 pdr batteries above the town, with many other battalions badly mauled.

6pm/T6

Pajol's 4e Cav Div is racing down to the crossing at Limal, as an outflanking manoeuvre is looking like the only way through. Hulot's 14e Div has started engaging 5th Kurmark LW at Bierges, but making little progress. 1/34e of Habert's 10e Div was the first to try and force the Pont du Christ, but was repulsed by 2/1 Kurmark LW. Thielmann's guns are making little impression against the big Prussian battalions. Lefol s leading 8e Div towards Basse Wavre to put pressure on the N flank.


The fight around Wavre and Pont du Christ from the Prussian side.

7pm/T9

Pajol's 4e Cav div has secured Limal and is pushing on beyond it, backed by 9e Cav Div. Hulot's 14e Div is in a prolonged struggle for Bierges but each assault is pushed back with heavy losses. The same situation in Wavre and Basse-Wavre where Habert's 10e Div and Lefol's 8e div respectively are also suffering for no gain. 11e Div is being sent S to Limal, as will be the just arrived 12e and 13e Div. Thielmann's has ordered Stengel to move against the threat from Limal, along with 1st Cav Div.

Forcing the crossing at Limal.

Day 1 ended with stalemate in Wavre and at Bierge, but the French pouring across at Limal on the SW edge of the battlefield.

DAY 2

The French lined up early on the 19th of June, the day after Waterloo, ready to attack.

No write-up from Day 2 I'm afraid, but the French had overwhelming numbers. It was still a hard slog though, pushing the Prussians back into the woods, and trying to get around their L flank by following the ridge line above the Dyle. As news of Napoleon's defeat at Waterloo filtered through around 11am (game turn 9) the French were ready to push out of the woods and onto the Wavre-Lasne road, but there was still a strong defensive line waiting to meet them as they left cover and tried to regain order - so there's a good chance that the Prussian's may have been able to hold them off.


The last turn, the French (attacking from right), ready to break out of the woods and face the new Prussian defensive line.

Thursday, 12 November 2015

100 Days Bicentenary: Ligny


Nick at the Ligne Brook in Ligny itself, 2015


After Quatre-Bras it was time to play Ligny. When Nick and I visited the village in 2015 it was deathly quiet and quite heavily built up. The small museum was worth a visit though.

The wargame was played solo using SLS Brigade-scale rules, with 200m per hex hexon terrain and 6mm figures (two element per bde).

The notes below are verbatim from my notes at the time. Will tidy up if I get bored sometime.


Starting deployments, view from South

3.30pm (T2)

A bloody and poor start for the French. Lefol's 8eme Div gets pushed back from St Amand with heavy losses by Jagow's 7th IR. Berthezene's 1/11eme is now engaged, but 2/11 faltered. Habert's 10eme is moving up to exploit once 11eme breaks in. In the E Vichery's 13eme Div tried to cross W of Ligny but was decimated by the Grand Battery of I Corps on the heights W of Ligny. Pechoux's 12eme Division took heavy casualties assault Ligny itself with 2e Bde being forced back, but 13th RIR withdrew back in the face of 1e Bde's follow up assault - the Bde having faltered on the original assault. Rome's 1e Bde is left in position of SE Ligny, but totally isolated.

4.30pm (T4)
An hour of stalemate. Berthezene's 11e Division finally routs 7th IR, with Dufour's 1e Bde moving into S St. Armand. For the next hour Jagow's 29th RIR tries to counter attack but fails. Habert's fresh 10e Div waits patiently. Likewise in Ligny Henckel's 19th RIR and 4th Westfalen Landwehr fail to stage an effective counter- attack, and even the guns of I Corps are having less effect, so Rome holds tight as Vichery and Schoeffer rally their troops and move back up to his support. Blucher gives orders to Pirch II's 2nd Bde to move forward to support Jagow.

5.30pm (T6)
Berthezene's 11e Div fails to go home against 29th RIR in St Armand so Habert's 10e takes over, but 1e Bde falters and only 2e Bde goes in, and the fight continues. Rome's 1e Bde of 12e Div tries to break out of Ligny against 4th Westfalen Landwehr but is pushed back, and then 19th RIR delivers the killer blow and ejects them from Ligny and back across the river. 19th RIR takes up on position on the bridge as 2e/12e gets ready to assault, supported by Vichery and 13e Div. No sign yet of the guard.

6pm (T7)
Guard arrives!

7pm (T9)
With the Guard now available Napoleon begins to force his way across the Ligny between St Armand and Ligny itself. Habert's 10e Div fails to force its way through St Armand, being held by 3rd Westfalen LW. The Guard guns force 2nd Westfalen LW holding the Ligny E of St Armand to retreat, allowing Duhesme's 2e Bde YG to cross, and Dubois' Cuirassier of 1/13e also cross in good order. Chatrands 1e Bde YG is prevented from crossing by the stout defence of 6th IR and Rohl's guns of I Corps. Vichery's Bdes make a joint attack on Ligny, but although their attack falters 19th RIR is forced to retreat. Pechoux's 1/12 under Rome then rushes through into the village, but at cost, and are rapidly fowear back out by a counter attack from 21st RIR from 8 Bde, with 23rd RIR from 8Bde also moving into the village. Blucher orders up I Corps Cav and 7 Bde ready to fill the hole that now threatens to open up between Ligny and St Armand.
The French begin to get across Ligny Brook.


8pm (T11)
Duhesme's 2e Bde YG tries to take the I Corps guns in the flank, but after repeated attempts is routed. The 1e YG makes it across the Ligny in St Armand but is also forced to retreat by the guns in front of Brye mill. There place is taken by 1/11 Bde, and 1/10 Bde also make it across, but still the guns hold out. The Guard guns force both 2e Westfalen and an elm of 1st Cav Bde back, and Morands Chasseurs form square and force back the rest of 1st Cav Bde, but don't have time to move against the guns. The rest of the Chaseurs and Grenadiers also come across the Ligny, but generally in poor order, which hampers immediate exploitation of the gap that is opening up. 2e YG has more success against the II Corps guns, and takes out their supporting infantry, but they are then counter-charged and routed by Lutzow's 2nd Cav Bde, which pursues them across the Ligny but into the face of the just arrived 1/14 Cav Bde under de Creux, who even at the halt force them back across the Ligny and up the slope. 2/14 also crosses. 13 Bde had already been routed by the gun fire from II Corps.Vichery can only maintain a watch on Ligny itself which is now held strongly by 8 Bde, and Steinmetz in Wagnele is still untroubled.

9pm (T13)
The Chasseurs of the Guard lead the assault on the guns by Byre mill, carrying them and the infantry beyond with no trouble. Du Creux's Cuirassier get the better of Lutzow's cavalry, and their rout causes a chain reaction in the Prussian rear with many spent units taking flight. Blucher orders 7 Bde to form a protective line from the windmill to Ligny, but Friant's Grenadiers then move against it, supported by Morand's 2e Bde and the whole line is sent into retreat, and the French finally take the mill. 2e Grenadier under Roguet pile into a recovering Prussian unit NW of Ligny (there most forward unit), sending that into a rout, which takes all the remaining recovering units with it. Colbert's 1/15e Cav comes up to support the now exposed Grenadiers but find the Prussian 4th Westfalen LW too tempting a target behind Ligny, but the LW form square in time and an ineffectual melee commences. Blucher now sees that all is lost and so moves his II Corps cavalry up to screen his retreat as night falls. There is a last minute attempt by Gengoult's 1/10e Bde to get into S Armand La Haie but they are beaten off by 24th RIR. At Ligny the Guard Artillery commence a bombardment, taking casualties off 23rd RIR, but Vichery doesn't have the strength to attack, but the village ends surrounded. Night falls with French secure on the N ridge line and holding St Armand, whilst Blucher's cavalry screen the retreat of the remnants of his Army, 1 Bde slipping out of La Haie and Wagnelez, but the 8th Bde in Ligny being abandoned to its fate.
ENDEX - The French, led by the Guard, are across but the Prussians are still putting up a fight


 At the end:
  • The French had 4 div at spent or worse. (3 spent, 1 routed)
  • The Prussians had 7 div equiv spent of worse ( 3 spent, 4 routed, 1 surrounded)
  • This gives the French a score of  7x2-3x4 = 2
  • And the Prussians a score of  4 x 2 - 3 x 7 + 2? = -11
So net +13 to the French, which is well over 5 so a Decisive Victory for the French


Monday, 12 October 2015

100 Days Bicentenary: Quatre Bras

Gemioncourt Farm from the Allied lines looking South

After the so-so Brigade level refight of Quatre Bras it was time to do it at Bn level as intended. 6mm, with hand-drawn 40mm hexes, and custom hill contours cut from ply (and desperately in need of a jig-saw!). Rules were standard SLS.

Starting positions, looking N. Felt hexes at right show low ground.
Note Straight dump of the notes I made at the time on my iPad.

1500 (T3)
Bylandt has been able to rush 7th Belgian into Gemioncourt and 8th Militia into La Bergerie, and place 5th and 7th Militia above the Gemioncourt brook. Goedeck's 2nd Bde lines the wood and Grand Pierpont awaiting the late arrival of Jerome. Unfortunately Stevenaar's battery opposite was not supported or withdrawn by the time that Pire's 1er Chassuers a Cheval charged it and the guns were over-run. However as the 1er pursued the gunners they ran into the advancing 2/2 Nassau who formed a hasty square and repelled the Chassuers, who were now quite weakened from their two encounters and withdrew. Foy and Bachelu have advanced their divisions to the Gemioncourt brook. Merlen's cavalry is hastening towards Quatre Bras. As the hour turns Best's 4th Hanoverian Bde and Kempt's 8th Bde are just arriving from the North, but their is no sign of Jerome.

1700 (T9)
Soye has pushed the Nassaus out of Pierrepoint and back into Bossu wood. 5eme Lancers rode down 2/2 Nassau just E of the wood. Gauthier pushed 7th Belgian out of Gemincourt but lost a battalion in the process. Guathier and Baudin advancing slowly up the road towards La Bergierie, supported by Hubert's Chassuers. British reinforcements have now arrived, so Merlen shadows the French Chasseurs whilst Pack's 9th Bde establishes a new line a La Bergerie, with Best's Hanoverians lining the sunken road. Jamin has finally pushed across Gemioncourt brook after 4eme Legere took heavy losses from 28J. 1st Brunswick Bde is forming up as a 2nd line behind Perponcher. Husson has also crossed N of Pireauoment, cutting the road and delaying Wellington. kempts's 8th has hurried to the edge of the Cense wood, and 1/95th are already inflicting casualties on the skirmishes of 2/3eme. 11e and 12e Curassier Div have arrived but are being held in reserve.

Jamin finally gets across the Gemioncourt Brook

1800 (T12)
A busy hour. On the left Soye finally makes headway against Goedeck, forcing his skirmish line off the edge of the wood, but 1/2 Ligne is spent for its troubles and 3/2 is shaky. In the centre the large 6eme Chasseurs tried to break the emerging Allied line but failed to charge home against the 92nd Highlanders who stood firm in line. Guathiers 1/9 Bde has been pushed to the fore, but 1/92eme is taking heavy casualties from a Dutch foot battery, and 8th Dutch militia successfully held La Bergerie against a first assault by 2/93eme, but have now been relieved by 42nd Black Watch. Buadin's 1/6 Bde is now massing behind Gauthier. On the Gemioncourt stream Jamin's 2/9 Bde finally came to grips with Bylandt at the top of the valley. The Dutch artillery managed to stop 3/100 pressing home, and 5th Militia managed to hold 3/100 just above the Materne. But 1/4 and 3/4 managed to drive home against 7th Militia, and then fell on the gun and on 5th Militia's flank. 27th Jäger the counter-attacked, sending 1/100 and 1/4 packing, but they are now threatened by 2/4. 3/4's pursuit of 5th militia brought them into the path of Kempt's counter-attack and they were routed. Husson's 1/5 Bde having suffered badly from 1/95ths skirmish fire whilst reforming from crossing the screen finally went over the the offensive, but the rifles melted away to revalue a strong British line. One French Bn (2/61?) stalled in front of 79th Cameroon Highlanders, who counter charged, routed the 2/61, and then the 2/3eme for good measure. 32nd chased off 1/61 and 3/4eme. The British have now regained the road, but Campi's 2/5 Bde is now largely across the stream. All the heavy cavalry is in reserve, and hour ago with no targets, but now with potential expolitation in the centre, or stabilisation tasks on the E flank. Both Jamin and Husson's Bdes are spent and are withdrawing.

1900 (T15)
The tide is turning. In the west though Soye continues to push through the Bossu Wood with Goedeck withdrawing before him. But Goedeck's reserves are coming up and Maitland has just arrived from Nivelle. In the centre Hubert's Chasseurs have twined thrown themselves against the 92nd Highlanders but been pushed back, as has Gauthier's 1/92eme. Most of Gauthier's Bde is now spent, and 3/93eme was repulsed from La Bergerie, and Baudin's 1/6 Bde is now making what might be the final attempt to break through as Halkett's 5th Bde is hurrying to support Pack, who has anyway now pushed forward of La Bergerie. East of centre Bylandt's rallied forces have chased Jamin back over the Gemioncourt brook, and Merlen is moving forward to exploit the large gap between Bachelu's 5e Division in the east and the rest of Ney's forces. Butlar's Brunswickers have also been ordered forward. The French heavy cavalry has been sat passively waiting and has only now had orders from Ney to make their own attempt to fill the gap left by Jamin. In the East Kempt's 8th Bde has now cleared the road of Husson's 1/5 Bde, and Campi's 2/5 Bde, and Wellington has finally made it up from Ligny. In the fight for the road Campi pushed two battalions up against the advancing British line. Both stalled, and the 79th counter-charged, wiping out one Bn and then charging on into the 2nd, routing that as well. This precipitated a rout of most of the rest of the French troops on this flank. Campi's one remaining battalion is now in full retreat.

2000 (T18)
Ney is now pretty well spent, and Wellington's best forces are only just arriving. In the W Soye continues to press through the Bossu Wood, but 3/1eme fails to go home against 2nd Dutch LW (huge unit), and Kleimansagge is now entering the wood from the N with 1st Hanoverians. In the centre the Brussels road has been held valiantly by the 92nd, and the 42nd in La Bergerie. The 92nd repulsed 1 & 3 eme Bn of 1eme Legere. The they held both 3/1 Legere and 2/2eme, unitil a charge In their rear by 3/2eme finally routed them. Meanwhile 6eme Chasseurs saw an opportunity and charged the run to the W of the 92nd, and then surprised the 44th who were sheltering on the reverse slope and were soundly routed. At La Bergerie 42nd still hold out against 1/2eme, and bounced 2/92eme. 3/2eme saw an opportunity to charge 1st Royal Regt, between the two highlanders, which it forced to retreat before turning on the 92nd. But although Pack's line is crumbling Halkett's 5th Bde has now come in behind it, and Maitlands 1st Guards is coming out of Quatre Bras. Against this Ney has almost no ffresh infantry. On the Gemioncourt brook Bylandt has reached the brook and stopped as the last of Jamin's troops race away. However 27th Jaeger and 4th LD stepped over the brook and were caught by Hubert's 8eme Cuirassier which had been sent to stabilise the flank along with Donop. The LD were mauled and chased back across the brook, and the 27th massacred in it. Butlar's 1st Brunswick Bde which had been heading to support Bylandt has now been swung W to take the French in the flank. Out on the E flank Kempt is now across the Pireamont brook, but Donop's 2/12 Bde of Carabiners is coming to meet him.

ENDEX - Ney's forces are spent and the Allies have regained their start line

2040 (T20)
A marginal victory to the Allies, and a decisive victory had Wellington focussed on helping Blucher rather than defeating Ney. In the West Soye continues to push through Bossu Wood, oblivious to the bigger battle - but the 2nd Dutch Militia managed to push back 3/1eme, and Kleinmansagge is now up in support. On the Brussels Road Butlar's 1st Brunswick Bde were swung away from helping Bylandt and instead advanced through the crops to take the French line N of Gemioncourt in the flank, 3rd Brunswickers penetrating furthest, sending two of Buadin's bn packing, but then being mauled by Hubert's horse gun on the rise, and then charged and massacred in the dying minutes by 5th Lancers. However Halkett's Bde had also joined the fray, with the 30th holding off both 1/1 and 3/1 Legere. Behind Halkett even Maitlands Guards are almost ready to join the fight, and Ney has no battalions with less than 3 damage - Gauthier's 1/9 Bde is already withdrawing, although his albeit battered cavalry is probably strong enough to cover the retreat. Even though Wellington did not quite reach Gemioncourt farm, Bylandt is sitting comfortably on Gemioncourt brook, and Kempt is across the brook and belatedly heading in Bluchers direction.


Wednesday, 17 September 2014

Craonne- Refights Compared

Positively my last post on Craonne, here is a map comparing the French front lines at 1100 (start), 1300, 1500 and 1700 (end) for each of the three refights.

Craonne - Three Refights.png

(open image in a new window to see detail)

Obviuously lessons were well learnt from refight to refight - principally making sure that both wings had a balanced all-arms fore, and that Ney paid less and less attention to Ailes and more to getting to the far side no matter what. Whilst that may fulfil the scenario objectives having Ney arrive in the midst of the main Allied move up to Laon may not have achieved all that Napoleon wanted, and may have lost him Ney's Corps. Even in the third refight where De Morvan got off too, and most of the French could have exited as darkness fell having the Allies wrapped up in Bovelle casualties had been high and the troops would have been little use for a battle next day.


***Imported from old blog***

Tuesday, 16 September 2014

Confederation of the Rhine 6mm/20mm


Just to finish off this strand here are the 6mm and 20mm versions of the Confederation of the Rhine contingent lined up for review.


***Imported from old blog***

Monday, 18 August 2014

Battle of Craonne - 6mm


The third of the Craonne refights was a solo game in 6mm. Learning from the previous two I transferred Roussel's 6th Heavy Cavalry Division from Grouchy in the centre to Ney on the right flank.

Rules were my own Steady Lads Steady (SLS) using a 100m hex grid and 20min turns.

Start time was 1100, with the French having already taken Hurtebise. Unless stated all flanks are with regards to the French, and South(S) = left flank and North (N) = right flank, and West (W) is the direction of the French advance. LC = left centre, RC = right centre.

To save on buiding terrain I used the arrowed hexes to show the main slopes, map style.

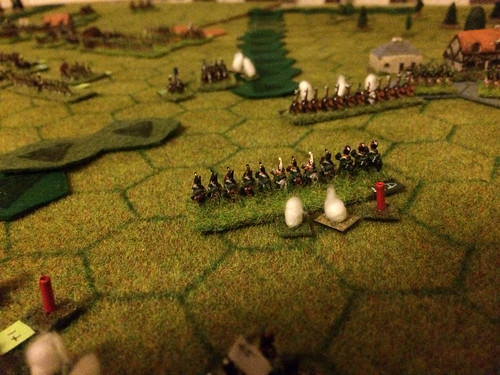
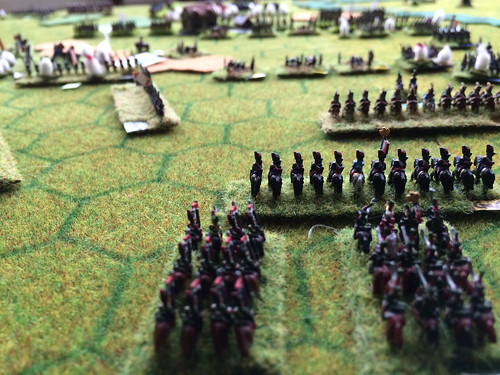
T1 (1100): Charpentier (L) and Rebeval (R) again press into the woods either side of the neck. The French and Russian guns duel on the neck with both sides infantry suffering.

T2: LC: Jaegers charge YG Voltigeurs but bounce. 2nd Jaeger regiment comes up but is charged and forced back by the YG. YG now in control of the wood.
C: One of Rebeval's battalions is routed by gunfire on the neck. Russians exchange damaged battalions with their 1st line reserves.
RC: Rebeval's skirmishers advance to contact in the wood.
R: Ney pushes on to Ailes, and the Cossacks descend off the plateau.

T3: LC: YG pushes up to the edge of the wood
C: Two more French battalions routed by the gun fire. Russians also suffering.
RC: Two of Rebeval's battalion charge in against the Jaegers, one bounces, the other goes into melee.
R: Ney's Dragoons push forward to meet the Cossacks.

T4 (1200): L: Nansouty arrives on the board, threatening the Russian R flank.
C: Christiani's Middle Guard begins to fill in the gaps on the neck caused by the decimation of Rebeval's battalions.
R: Cossacks charge Ney's Young Guard, who form square and the cavalry bounce. More cossacks charge Ney's Dragoons but also bounce.

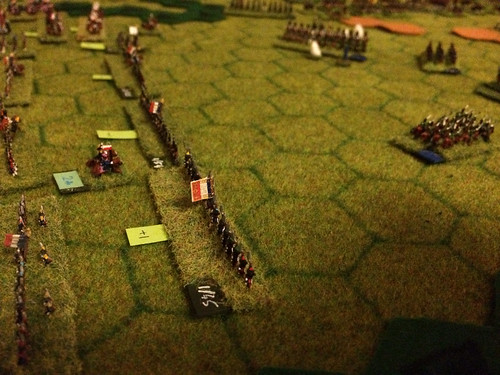
So far I'd been using the card driven activation I normally use with SLS. One downside is you spend a lot of time trying to find the formation (Division) on the table, and often you then don't want to do anything with it. So at this point I started using a PIP based system, each side getting about 5 - 10 PIPS a turn and being able to assign one or more PIP to a formation based on how keen they were to activate it first. This way not all units move, and its clearer who's going to activate. Sides activate formations alternately within a given bid value.

T5: L: Nansouty's cavalry routs some Russians caught forming square. Charpentier's skirmishers are trying to disable the Russian battery on the neck but having no effect.
C: The Middle Guard begin to push forward.
RC: The first Jaeger battalion finally breaks from the melee.
R: The Dragoons charge and get the better of the Cossacks

21 - A French Dragoon unit reforming after a charge against the Russian left flank

Dragoon face off against Russian Cossacks on the slope above Ailes.


T6: L: De Morvans Young Guard (supporting Nansouty), and Exelmans mixed cavalry division arrives on table. Nansouty's Guard Chasseurs a Cheval swoop down on the Russian line, routing a battalion. Two cossack regiments try to counter charge but bounce off the rest of Nansouty's cavalry.
C: Two battalions of Christiani's Middle Guard go into the assault supported by the Guard Artillery. The LH battalion routs a Russian Musketeer battalion and forces another back, and takes a 12 pdr battery. The RH battalion is stuck into a melee with a Grenadier battalion and taking damage.
CR: Rebeval's forces reform having routed the last Jaeger battalion.
R: One cossack regiment beaten in melee, the other breaks off

T7 (1300): L: Cossacks charge Nansouty again but are repulsed, but 1st Guard Lancers shaken. De Morvan's infantry slowly advancing as the Russians try to stabilise their R flank.
LC: Charpentier finally has his Division all out of the woods.
C: The RH MG battalion is routed, the R of the Russian line holding, but only just. The next wave of MG battalions is coming up.
RC: Ney's Spanish Brigade catches the last Jaeger battalion retreating out of the woods and decimates it.
R: Dragoons push the Cossacks back up onto the plateau. Ney's leading forces now into the woods and swamp N of Ailes - aiming to bypass Ailes leaving the Spanish brigade to take it.

T8: L: Slow advance by De Morvan. 1st Guard Lancers make an opportunistic charge against a Russian 3rd line gun behind La Bovelle, take it out, but find themselves embedded in the Russian squares. 2nd Guard Lancers rout a Russian battalion from square (it was already damaged), and the Guard Chasseurs a Cheval engage another square.
C: Christiani finally clears the Russian 1st line by the neck, routing 2 battalions and taking two batteries.
R: Ney makes slow progress through woods pass Ailes. Roussel's Dragoons are up on the plateau threatening the Russian 2nd line, but being shadowed by the Cossacks.

23 - De Morvans Young Guard supported by Nansouty advance on the Russian right flank

De Morvan's Young Guard advance on the left flank - with light cavalry harrassing the Russian flank

Decided that the PIP based command and control system was making little difference as most bids were for just 1 point, so back to old card based system.

The other change was to add 2 hex to all movement, so as to enable the 2nd wave of French troops to move into action more quickly and also give Ney at least a chance to reach the board edge - which given the woods and swamp he could not arithmetically meet given the current movement rates even though unopposed. The +2 worked well so I may keep it.

T9: L: 3rd Guard Lancers and Cossacks clash, whilst 2nd Guard Lancers take out another square. De Morvan is pushing forward and Rebeval's Young Guard force 2 Russian battalions back.
C: Christiani's Middle Guard clears the Russian 2nd line by flank attack and Guard Artillery. Old Guard Cavalry finally on board. Russians forming 3rd line in front of La Bovelle.
RC: Roussel's Dragoons push two Cossack regiments back, and roll up left flank of 2nd line, routing a battalion and taking two batteries and forcing another battalion back.
R: Ney making good progress in the wood and the Spanish Brigade about to assault Ailles.

T10 (1400): L: Nansouty's Guard Heavy Cavalry pushing hard down past La Bovelle push a Russian dragoon regiment off the board. A wave of De Morvan's Young Guard crash against the R of the Russian 3rd line alongside La Bovelle. Note: Nansouty here has made the move that failed in the Liphook game, managing to get passed the L of La Bovelle before the Russians could close the gap.
C: Melees going against the Russians, and French Guard Artillery moving up to pile on the pressure.
R: Ney's leading units through the wood. Spanish Brigade guns opening fire on Ailles.


41 - end turn 10

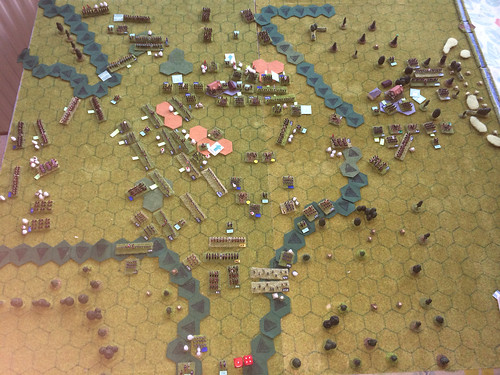
Nice overview of the end of turn 10

T11: L: Nansouty's Guard Cavalry finally clear all Russian cavalry from SW of La Bovelle. De Morvan's YG pushes one Russian bn back, but repulsed by Russian 3rd line. Other melees still ongoing.
C: Guard artillery opens up on the 3rd line. Old Guard finally make it on to the table. Christiani's Middle Guard reform ready for a renewed attack.
R: All of Ney's 1st and 2nd Voltigeur Divisions through the woods. Spanish division assaulting Ailles but not going well.

47 - the Russian battalion about to break

De Morvan's Young Guard finally breaks the Russian right flank

Time for a change of Command and Control again. Prompted by a review of some other rules I now draw 5 cards, and checking suit only that is how many formations each side can move, alternating as long as possible. Choice of formation up to commander, but only 1 activation per turn. Repeat in 5 card blocks til end of turn. Worked really well.

T12: L: Guard Lancers finish clearing most of the Russian light cavalry off of the board.
LC: Final Russian 2nd line battalion routed, had really been holding up De Morvan and Charpentier from getting to grips with the Russians L of La Bovelle - leaving the cavalry to have to do most of the work.
C: Guard Arty rout one Russian battalion through weight of fire. Middle Guard assault stalls on L due to ferocious return fire from the Russian guns, but goes in at R. Old Guard and Guard Cavalry parked up to watch the final moves. Roussel's Dragoons reform and Charpentiers Young Guard hurries in to support the MG.
R: The fight for Ailles goes on.

T13 (1500): L: Final Russian cavalry routed. Fr cavalry now has free reign and is behind the Russian 3rd line which it ploughs into the back of.De Morvan's Young Guard now pushing round the L of Bovelle as well.
C: Melees all around Bovelle with YG and MG and Russians.
R: Ney reaches the edge of the board (Hurrah!). One Jaeger battalion forced out of Ailles, but the 2nd Jaeger battalion has repulsed the French assault.

49 - the Guard heavy cavalry looks on

The Grenadiers a Cheval and Old Guard look on from the neck whilst their more junior colleagues get stuck in to the fight around Bovelle

T14: L: De Morvan routs one Russian battalion which runs into the Cuirassiers milling behind it, carnage. Nansouty's cavalry now against the back of the Russian line. De Morvan is now heading for the board edge, the other Divisions and cavalry having La Bovelle under control.
C: The Russian defence crumbles as battalion after battalion beaten in the big melee. The remaining Russian guns defending La Bovelle taken in the flank. Dragoons try and join the fight but their target on the extreme R of the Russian line forms square in time and repulses them, Horse artillery brought up to support the Dragoons.
R: Spanish Brigade reforms ready for a renewed assault.

59 - the last Russian (Austrian?) unit left of La Bovelle

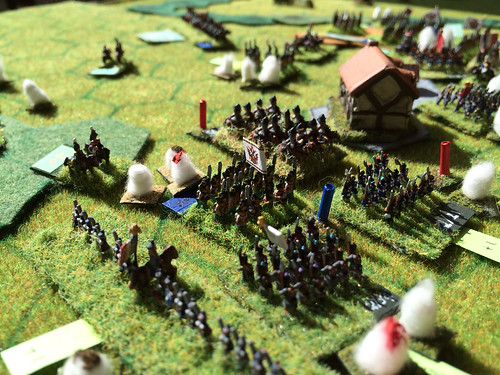
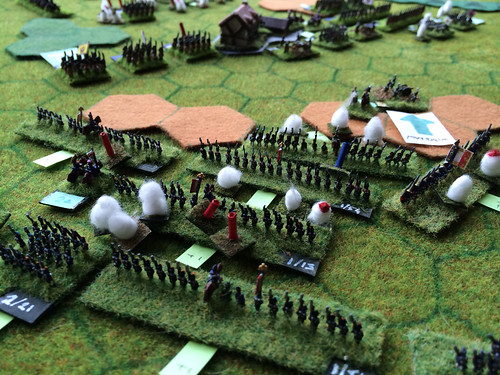
The final fight around Bovelle. Smoke puffs show damage, red markers disorder and blue markers ongoing melees.

T15: L: Last battalion L of La Bovelle routed and De Morvan now at the board edge.
C: The melee still going on against the last 4 Russian battalions, but with Nansouty now in their rear it's all over.
R: The final Jaeger battalion pushed out of Ailles.

At the end of Turn 15 (1600) I declared game over. Checking measurements, by the end of Turn 18 (the planned game end and same as others games) the Old Guard, Guard Cavalry and Ney's Cavalry could all have been off board.

So I think I'd manage to learn the lessons of the last two refights - essentially make sure that all three prongs of the assault (Nansouty, Centre and Ney) all had all-arms support, Infantry, Cavalry, and Artillery. As Napoleon's Maxim XLVII says "Infantry, cavalry and artillery are nothing without each other..."

The +2 on movement was also crucial to ensuring that the French could exploit and reinforce their success - bringing a much needed fluidity to the engagement. So often Napoleonic battles do become a slogging match with not much movement, but battle accounts always seem more dynamic. And there's the old mismatch between "real time" of ~2.5 minutes action per turn and "elapsed" time of 20 minutes per turn (which is about a 1500m march!)

I'll try and do a final post to compare the three battles.

For the record the losses were:

French: 10 formations, and ended with 6 formations still active (majority of elements with less than 3 damage), and 4 formations spent. Russians had 10 elements, but all spent. Russians had 42 units, so 210 CEF points, and had 14 CEF left on the board. French had 67 units so 335 CEF points, and had 174 left on the board. So the victory "cost" ~160 points, which is 32 battalions, about 4 divisions or 1 Corps. Probably a lot more than Napoleon would have been willing to pay.


***Imported from old blog***