Wednesday 30 May 2018

Battle of Hopton Heath - 1643 - STARTEX

View NE from above Royalist lines

With a still limited playing area the next game up was the Battle of Hopton Heath which took place in 1643 just outside of Stafford. I've been close to the site several times on trips to the Uni but never actually walked the site - must do so next time.

It's the first in my 1643 series of games for this year (last year was 1642), and as a large skirmish (~1200 men a side) ideal for the reduced tabletop. Since I was doing it in 20mm I decided to give Warlord's Pike & Shotte a go, although unlike with Rommel I'm not expecting much form them - but be interesting to see how they play.

The Parliamentarians had about 500 Inf, 400 Cav and 300 Dragoons, with 200 extra inf to arrive later. They established  defensive position along  a low rise, between two sets of enclosures and with the front of the infantry partly protected by a rabbit warren (!). The Royalists had 800 cav and 300 dragoons. They also had the Roaring Meg siege mortar to put terror into their opponents, with bot side also having lighter pieces.

Since the 500 inf were going to equate to what I normally think of as one unit, that equated to 3 P&S units (as they treat the shot sleeves as separate from the pike block). So that gave about 150 - 200 men per P&S unit, about 1:20, so the order of battle was as follows:

Parliament: 2 x shot, 1 x pike, 2 x Dragoons, 2 x Cav, 1 x small Inf reinforcement
Royalists: 4 x cav, 2 x Dragoons

Slightly more dragoons than in reality but needed to be split on both flanks and didn't want to mess around with small units.

The game has about 9 turns, assuming a standard 20min per turn elapsed time, 3pm start and dusk at 6pm. If that's tight I might play to 7pm.

On turn 1 Hastings (commanding the Royalists) failed his order roll for both Dragoon units, so nothing happened. On Turn 2 he succeeded on his R flank and the dragoons went forward. Roaring Meg roared, and caused zero damage, as did the lighter guns on both sides. The defending dragoons let rip at the advancing Royalists and caused 1 hit, but the Royalists failed to return the favour.

Parliamentary gunners keep their cool as the Royalist dragoons advance


Then the first surprise. Despite being 18" (1 hex = 3" for this) away the shot could take on the waiting cavalry. Given frontages I'm estimating each hex at 50m, so that's a 300m engagement! (The rules do say that ranges are set to be "playable" not accurate). Two of the Royalist cavalry units took a hit.

Turn 2 over. On to Turn 3.....


Tuesday 29 May 2018

Rommel Test Game

End Turn 6
In the first few Turns the British and Germans were getting stuck into a tank tit-for-tat on the (British) left flank, whilst on the right the Brits had eliminated the Italian forward positions and encircled the Germans holed-up in Sollum on the coast.

Sollum under seige


Turns 7/8 saw more of the same, with the tank battle seeing most units down to their last step - with a slight advantage to the Germans as they were getting +1 hit on each combat due to their superior tanks.

The Matildas go forward
At the end of Turn 8 an extra battalion or so of Kampfgruppe  Esebeck arrive. With no breakthrough on the L the British commander does a re-plan. Sollum is bound to fall, so for victory he just needs to take and hold the oasis as well. So all forces on the L are pulled back to defend the oasis. The Coast Bn which was in reserve on the R flank is road moved up to help, and as soon as Sollum falls those troops will also be moved up.

So the next few turns sees the British enact the plan and von Esebeck start to try and take the oasis, with other units providing a supporting role.

Sollum Falls, ~ Turn 11

As the battle around the oasis develops the British suddenly notice that the German gun line and supply depot is right in front of them and unprotected, so a "Jock Column" of a Matilda Sqn and Inf Coy is sent forward to reek havoc. They take out the Italian battery, but the German one escapes. They then camp out on the supply point, eating loots of sauerkraut and rendering all German units "isolated". In practical terms that just means they can't use a road move, so it stops any of their more distant units coming to the aid of the oasis fight.

"Jock Column" at right heading for the vulnerable depot and gun line
With the Coast Bn unlikely to hold the Brits thought they had a plan, with the Germans taking the oasis on Turn 14, the Brits retaking it on Turn 15 with the relatively fresh 1 SG just released from Sollum, and then reserving enough dice to hold it during Turn 16.

As it was the Coast Bn held on during Turn 14, and were then relieved in place by 1 SG. There was also a certain amount of gamesmanship with a Tank Sqn being left on the oasis so as to avoid Tank Shock.

So it came down to Turn 16, and the Germans making  literally the last throws of the dice to take the oasis. The Brits expected the Tactic that moves a unit out, and so had a dice ready for "quick reaction" to replace it , but instead the Germans played "no tactics", so all the Brit dice were useless and the Germans called down Reserve Arty and airstrikes to try and dislodge the Brits. Luckily on Turn 15 the brits has played prepare positions, so when the Germans scored 5 hits, 2 went on the prepared positions, 1 wiped out on the armour unit, but the SG companies were able to absorb a hit each  - so the oasis held and the Brits won.

The final battle


In the failing light (literally!) the heroic A & B Coy Scots Gds hold on!

Thoughts on Rommel

So, game over, and I don't think that my views changed a lot. A like what Sam Mustafa tries to do, in this and Blucher, and generally how he does it - you certainly can't fault the production quality - but there is always something that just doesn't gel for me. In Rommel I think its that it has the SAGA problem, it becomes more about how you muster your dice to achieve events and tactics that have no direct on-board presence than it is about moving the "toys" around. I really did feel that I could have played this SPI for no loss of interest, and actually for improved playability and usability. I also didn't particularly think the big squares worked for me, movement and actions were too coarse - even though I've found the 10cm hexes to work fine. There is also huge scope for gamesmanship I think, such as the anti-tank-shock example above (maybe that just good tactics) and also that in the attack on Sollum although I had a Bn on each flank I always attacked with 2 coy from one side and 1 coy from the other so as to get the "flank" advantage. If Sam really wanted to have a more grand tactical/strategic game I think we needed to the focus even higher, so Bn units to make table and events/tactics seem more equal.

Unfortunately I can't see myself racing to play it again - I think that Blitzkrieg Commander is still closer to what I want - so I may be rebasing all my new desert units after their first outing, or try them as-is on 4cm hex. I've promised myself a professional desert hex cloth, and then when BKC4 comes out we'll give it all a whirl again!


Thursday 10 May 2018

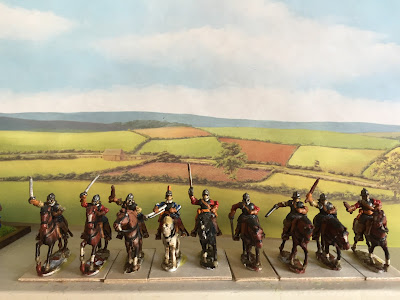
20mm ECW Cavalry


My first completed 20mm metal ECW unit using some nice figures from Tumbling Dice. Have also painted the Shot for a foot unit, but only now doing the Pike. Writing the book wiped out most of April from a painting/gaming perspective, but with that now at the publishers there's time to paint again (although still not much space to play...)